

Prerequisites:
- Kubernetes cluster set up and configured.
- Helm installed on your Kubernetes cluster.
- Basic understanding of Kubernetes concepts like Pods, Deployments, and Services.
- Familiarity with Helm charts and templating.
Introduction:
Deploying Keycloak on Kubernetes with an external PostgreSQL database can be challenging, especially when using Helm charts. One common issue is that keycloak deploys with a default database service when we use Helm chart, making it difficult to integrate with an external database.
In this article, we’ll explore the problem we encountered while deploying Keycloak on Kubernetes using Helm charts and describe the solution we implemented to seamlessly use an external PostgreSQL database.
Problem:
The primary issue we faced during the deployment of Keycloak on Kubernetes using Helm was the automatic deployment of a default database service. This default service conflicted with our requirement to use an external PostgreSQL database for Keycloak. The Helm chart, by default, would deploy an internal database, making it challenging to configure Keycloak to connect to an external database.
Problem Analysis
- Default Database Deployment: The Helm chart for Keycloak automatically deploys an internal PostgreSQL database. This default setup is convenient for simple deployments but problematic when an external database is required.
- Configuration Complexity: Customizing the Helm chart to disable the internal database and correctly configure Keycloak to use an external PostgreSQL database requires careful adjustments to the values.yaml file.
- Integration Challenges: Ensuring seamless integration with an external PostgreSQL database involves specifying the correct database connection parameters and making sure that these settings are correctly propagated to the Keycloak deployment.
- Persistence and Storage: The internal database deployed by default may not meet the persistence and storage requirements for production environments, where an external managed PostgreSQL service is preferred for reliability and scalability.
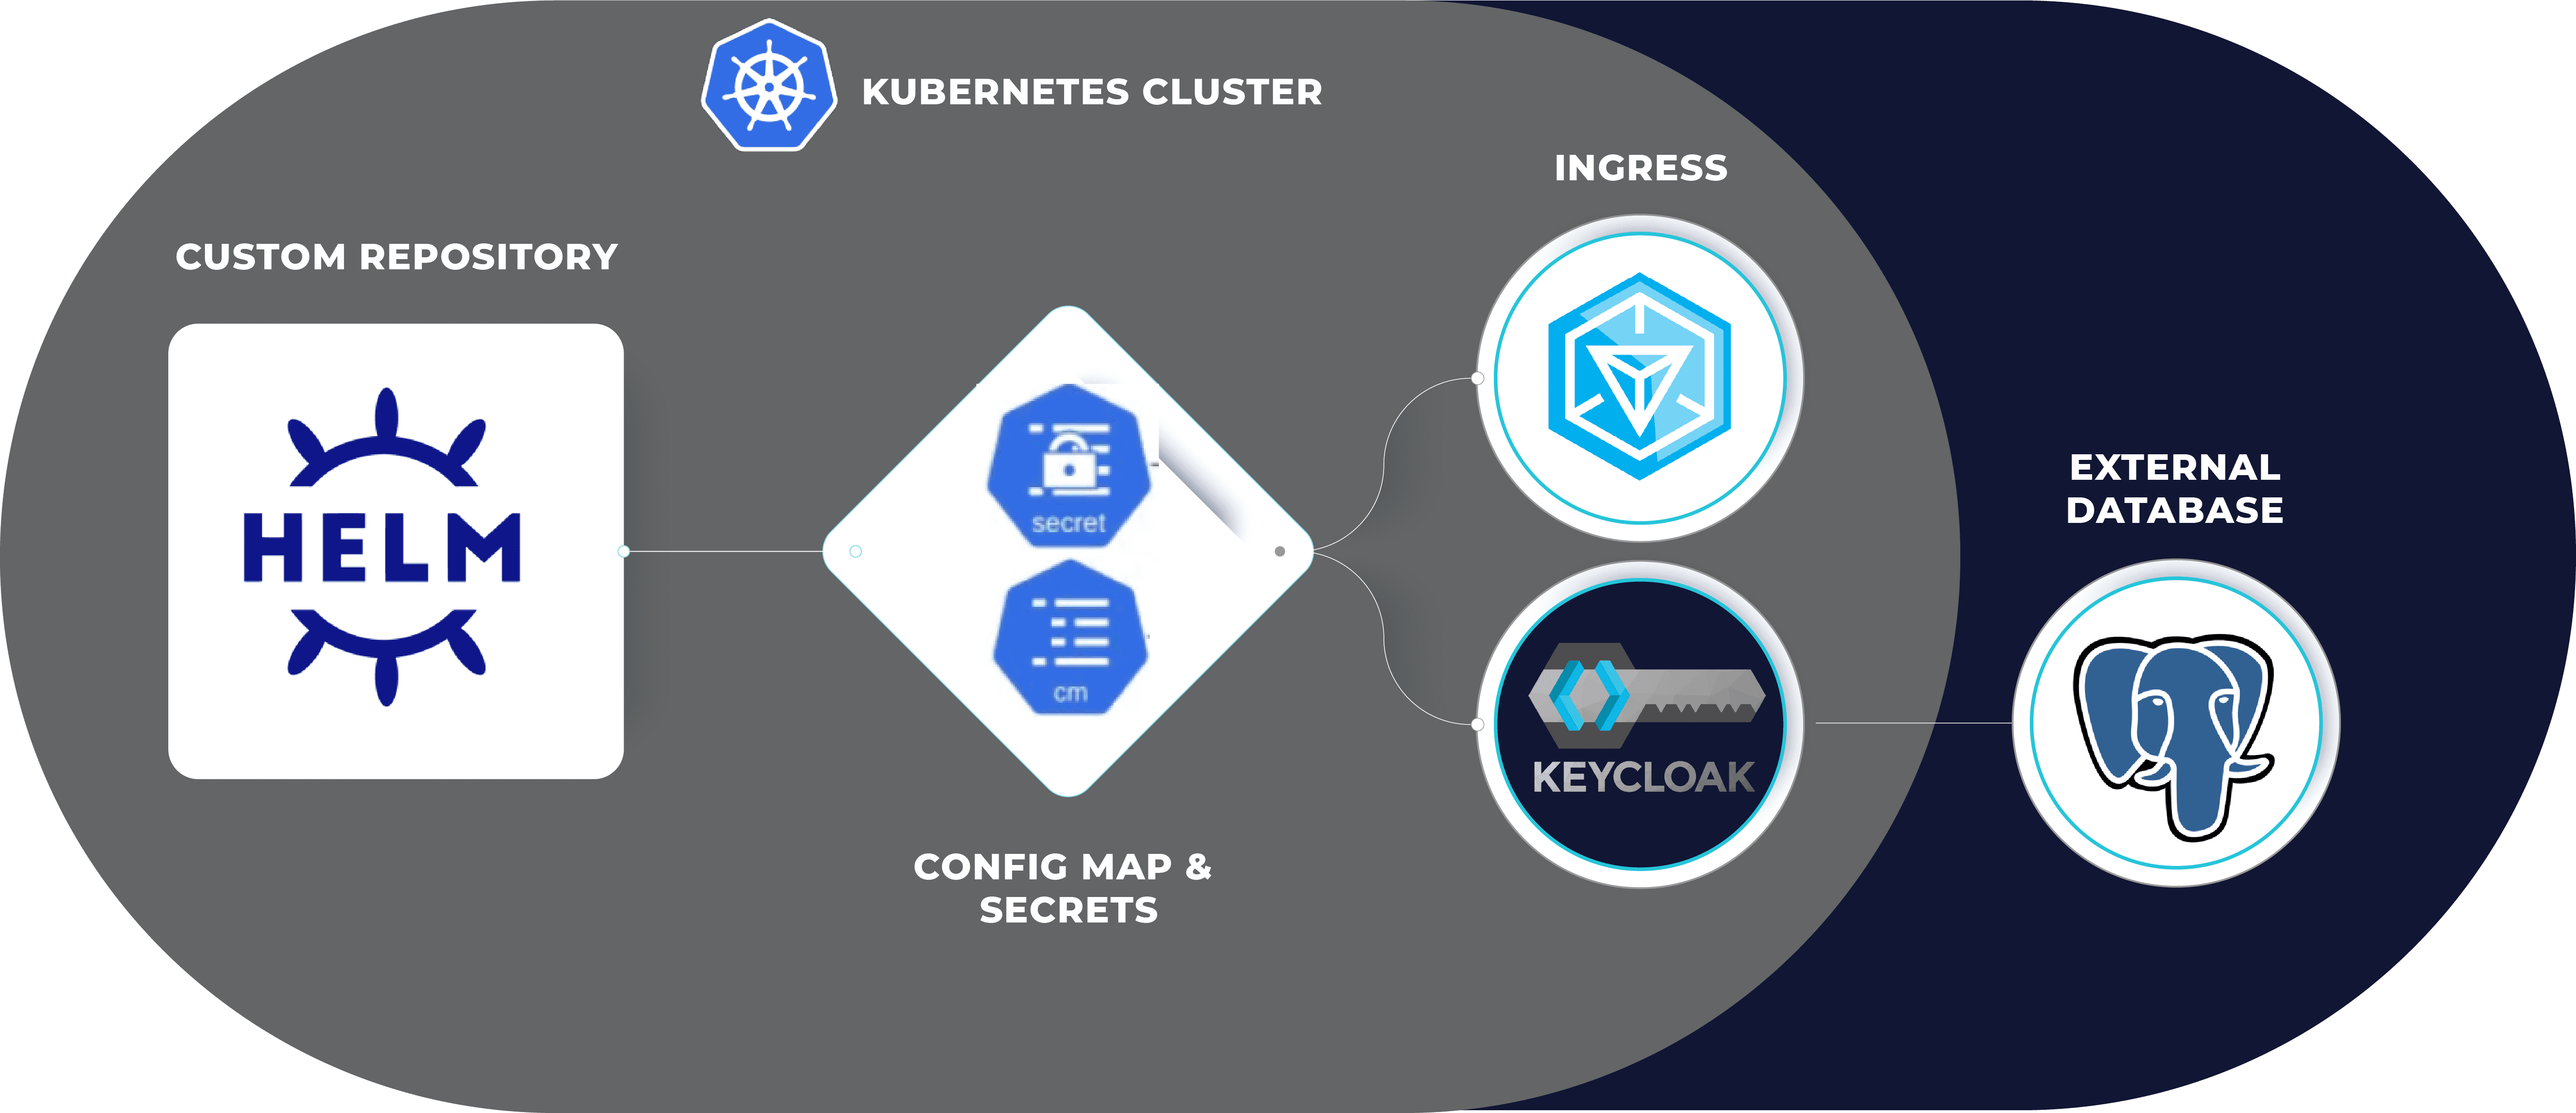
To address these issues, the following step-by-step guide provides detailed instructions on customizing the Keycloak Helm chart to disable the default database and configure it to use an external PostgreSQL database.
Overview Diagram:
Step-by-Step Guide
Step 1: Setting Up Helm Repository
If you haven’t already added the official Helm charts repository for Keycloak, you can add it using the following command:
helm repo add codecentric https://codecentric.github.io/helm-charts helm repo update |
By adding the official Helm charts repository for Keycloak, you ensure that you have access to the latest charts maintained by the developers. Updating the repository ensures you have the most recent versions of the charts.
Step 2: Customizing Helm Values
Objective: Customize the Keycloak Helm chart to avoid deploying the default database and configure it to use an external PostgreSQL database.
Configure Keycloak for development mode
Create a values.yaml File
- Create a new file named values.yaml.
- Add the following content to the file
image: # The Keycloak image repository repository: quay.io/keycloak/keycloak # Overrides the Keycloak image tag whose default is the chart appVersion tag: 24.0.3 # The Keycloak image pull policy pullPolicy: IfNotPresent resources: requests: cpu: “500m” memory: “1024Mi” limits: cpu: “500m” memory: “1024Mi” args: – start-dev – –hostname=<url> – –hostname-url=<url> – –verbose autoscaling: # If `true`, a autoscaling/v2beta2 HorizontalPodAutoscaler resource is created (requires Kubernetes 1.18 or above) # Autoscaling seems to be most reliable when using KUBE_PING service discovery (see README for details) # This disables the `replicas` field in the StatefulSet enabled: false # The minimum and maximum number of replicas for the Keycloak StatefulSet minReplicas: 1 maxReplicas: 2 ingress: enabled: true #hosts: # – <url> ssl: letsencrypt: true cert_secret: <url> annotations: kubernetes.io/ingress.class: “nginx” kubernetes.io/tls-acme: “true” cert-manager.io/cluster-issuer: letsencrypt cert-manager.io/acme-challenge-type: dns01 cert-manager.io/acme-dns01-provider: route53 nginx.ingress.kubernetes.io/proxy-buffer-size: “128k” nginx.ingress.kubernetes.io/affinity: “cookie” nginx.ingress.kubernetes.io/session-cookie-name: “sticky-cookie” nginx.ingress.kubernetes.io/session-cookie-expires: “172800” nginx.ingress.kubernetes.io/session-cookie-max-age: “172800” nginx.ingress.kubernetes.io/affinity-mode: persistent nginx.ingress.kubernetes.io/session-cookie-hash: sha1 labels: {} rules: – # Ingress host host: ‘<url>’ # Paths for the host paths: – path: / pathType: Prefix tls: – hosts: – <url> secretName: “<url>”
extraEnv: | – name: PROXY_ADDRESS_FORWARDING value: “true” – name: QUARKUS_THREAD_POOL_MAX_THREADS value: “500” – name: QUARKUS_THREAD_POOL_QUEUE_SIZE value: “500” |
This configuration file customizes the Keycloak Helm chart to set specific resource requests and limits, ingress settings, and additional environment variables. By setting the args to start Keycloak in development mode, you allow for easier initial setup and testing.
Configuring for Production Mode
- Add or replace the following content in values.yaml for production mode:
args: – start – –hostname=<url> – –hostname-url=<url> – –verbose – –optimized – -Dquarkus.http.host=0.0.0.0 – -Dquarkus.http.port=8080 |
Note: The production configuration includes optimizations and ensures that Keycloak runs in a stable environment suitable for production workloads. The –optimized flag is added for performance improvements.
Configuring for External Database
- Add the following content to values.yaml to use an external PostgreSQL database:
args: – start – –hostname-url=<url> – –verbose – –db=postgres – –db-url=<jdbc-url> – –db-password=${DB_PASSWORD} – –db-username=${DB_USER}
postgresql: enabled: false |
This configuration disables the default PostgreSQL deployment by setting postgresql.enabled to false. The database connection arguments are provided to connect Keycloak to an external PostgreSQL database.
Step 3: Deploying Keycloak with PostgreSQL and Custom Themes Using Helm
Objective: Add custom themes to Keycloak and deploy it using Helm.
- Add the following to values.yaml to include custom themes:
extraInitContainers: | – name: theme-provider image: <docker-hub-registry-url> imagePullPolicy: IfNotPresent command: – sh args: – -c – | echo “Copying custom theme…” cp -R /custom-themes/* /eha-clinic volumeMounts: – name: custom-theme mountPath: /eha-clinic extraVolumeMounts: | – name: custom-theme mountPath: /opt/jboss/keycloak/themes/ extraVolumes: | – name: custom-theme emptyDir: {} |
This configuration uses an init container to copy custom themes into the Keycloak container. The themes are mounted at the appropriate location within the Keycloak container, ensuring they are available when Keycloak starts.
Step 4: Configuring Keycloak
Objective: Log in to the Keycloak admin console and configure realms, users, roles, client applications, and other settings.
Access the Keycloak admin console using the URL provided by your ingress configuration.
- Log in with the default credentials (admin/admin).
- Configure the following according to your application requirements:
- Realms
- Users
- Roles
- Client applications
The Keycloak admin console allows for comprehensive configuration of all aspects of authentication and authorization, tailored to the needs of your applications.
Step 5: Configuring Custom Themes
Objective: Apply and configure custom themes within the Keycloak admin console.
- Log in to the Keycloak admin console using the default credentials (admin/admin).
- Navigate to the realm settings and select the “Themes” tab.
- Select and configure your custom themes for:
- Login pages
- Account pages
- Email pages
Custom themes enhance the user experience by providing a personalized and branded interface. This step ensures that the authentication experience aligns with your organization’s branding and user interface guidelines.
Conclusion
By following the steps outlined in this article, you can deploy Keycloak with PostgreSQL on Kubernetes using Helm, while also incorporating custom themes to personalize the authentication experience. Leveraging Helm charts simplifies the deployment process, while Keycloak and PostgreSQL offer robust features for authentication and data storage. Integrating custom themes allows you to tailor the authentication pages according to your branding and user interface requirements, ultimately enhancing the user experience and security of your applications.
Frequently Asked Questions (FAQs)
Keycloak is a modern applications and services open-source identity and access management solution. It offers various functionalities such as single sign-on, identity brokering, and social login which help in making user identity management easy as well as application security
Deploying Keycloak on Kubernetes means that you can have an elastic application that can be extended according to the number of users, resistant to failure on case of external services unavailability or internal server crashes; it is also easy to manage, has numerous protocols for authentication mechanisms and connects with different types of external databases.
Helm charts are pre-configured Kubernetes resource packages that simplify the efficient management and deployment of applications on Kubernetes.
To disable the default PostgreSQL database, set postgresql.enabled to false in the values.yaml file.
Provide the necessary database connection parameters in the values.yaml file, including --db-url, --db-password, and --db-username.
You can add custom themes by configuring init containers in the values.yaml file to copy the themes into the Keycloak container and mounting them at the appropriate location.